


Learn how to tie the Rear Floating Squid Fly pattern, including step-by-step instructions, a video tutorial, pictures, and much more. Improve your fly-tying skills here.
Trident Fly Fishing is a full-service fly shop. We spend a lot of time testing gear and writing reviews to give you all of the tools to make your next trip a success. We are not a blog or a review site. 100% of our funding comes from your gear purchases, so if this blog post helps you on your next fly fishing adventure, please support us by buying your gear from us.
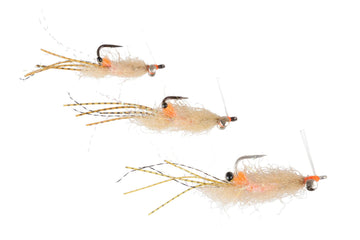
They don't call striped bass "squid hounds" for nothin', and Bob Popovic's Rear Floating Squid is a must have anytime calamari is on the menu. Designed so that the body sits just under the surface, while a buoyant head pushes water and creates an irresistible bubble trail every time you strip it. Whether you're after tuna chowing down in squid in blue water, yellowtails In the pacific, or angry bluefish in New England, this is a fly that you can take anywhere. Tie it in whatever color you like, the Rear Floating Squid should have a place in every one of your salt boxes.
Video Transcript
Hey guys, Levi here with Trident Fly Fishing and today we're going to be tying a rear floating squid. This is a really awesome squid pattern designed by Bob Popovics. It kind of looks in the water unlike any other squid - it has a real good profile and real good swim to it. You'll see once we get on into it.
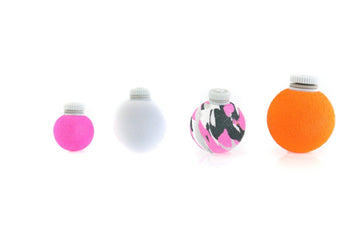
We're going to get started off the vise with some 3/4 inch foam cylinders from River Road Creations, color white. I'm going to grab one of these and our first step is to cut probably about an inch off the end of it. You can save that - it's a good popper head for another one of Bob Popovics' fly patterns. So once we have that, we're going to move in here with this silver tape. It's the tape used for lures, that sort of thing, but it does work really well for this fly. I want to come in and place this right on there, and I'm just going to roll it down at least once, but if you cover it a second time you just get a little extra security on that. Cut that off and seal it in, and then I'll move into my actual fly tying scissors. I'm going to cut that straight and then cut along there. When I trim this, I just use the foam as a guide and trim all the way around. You want to make this as neat as you can, but it ultimately doesn't make a huge difference. Roll this on until you're happy with it. This is going to be the clean side - we're going to use that up front of the fly.
From there, we're going to move into these adhesive eyes. These are the 3D ones, but I went ahead and took the 3D part off so they're nice and flat. What I'm looking for is that line on the tape - I'm going to get that right on there. It's going to just provide a little extra security to your fly. Now that we have one on one side, we're going to fold it and put it right on the other side. You can do your best to match them up, and if you want them to be additionally stuck on there, you can hit them with some adhesive. What we did with these is - these are 3D dome eyes, but they don't quite have the ability to stick on the side because of that 3D aspect. So what I did was just broke that 3D part right off, and you'll get a nice flat eye. We're using big eyes because squid do tend to have a pretty large eye if you look at them.
Now we need to put a hole right in the middle of this cylinder. My hands tend to not be super straight, so I don't like to heat my bodkin up first. Instead I'll work this through on one side, flip it over, get it on that side right in the middle, and I'll eventually get these two to meet. There we go - nice and centered. What I do, instead of heating the bodkin up first, I'll just heat it up now and pull this through. I'm not looking to really bore a hole in there because I want the 80 pound mono that we're using to fit in there snugly.
Our next step is we're going to put six tentacles on this squid pattern, so we need to put six holes in here. I do one right here, right underneath of it - that's two holes. Then one here, and one right over there, and I'll just fill in the gaps. Now that I've got those sort of pre-put in place, I'm going to heat up my bodkin and get in there and cinch them. This space will all get covered up with our feathers.
Let's get this 80 pound mono through the back and grab our lighter again. We're going to create a nice little ball on there, and I'll just pull that straight down and hit it with my finger. That'll be nice and snug - it won't go loose - and you can also hit it with some epoxy once we mix that up. I put two more holes in here, making an even eight, just because that's going to give me some leniency in terms of where my tentacles are going to go. It's not necessary, but I just kind of wanted to have that option.
We have six pre-selected nice saddle feathers, and what I was looking for with these is a nice even stem with some thickness to it, because we're going to put these into some holes and it just helps to have some support. Get those worked out before you mix your epoxy so you're not rushing through that five minute cure time. From there, we're going to move into a two-part Devcon epoxy. You don't need a whole lot, but give yourself enough. When you're mixing epoxy, it's very important to have exactly the same amount from each part. I'm going to come in here with my bodkin and just mix this up. I'm using a sticky note, which is another Bob Popovics idea - it's nice because it sticks and you don't have to worry about it sliding around.
First things first, I'm going to get a little bit of epoxy right on that mono and just pull it straight in. That'll seat that nicely and it won't budge or move. From here, I'm going to grab each saddle, dip it into the epoxy, and put it right in the hole. You want to do this slowly - take your time. You also want these feathers to all curve inward. We're just working our way around this, creating a nice profile to this squid. I can't think of a better or more realistic way to tie a squid. Now I'm just going to look this over, make sure we don't have any huge gaps, and make sure these feathers are all facing inward.
Now that we have all of our feathers tied in, you'll see we have this real nice set of long flowing tentacles and our mantle. That's all done, so we can set that aside while we get into our tying procedure.
Now that we have our tentacles and mantle done, we're going to move into an Ahrex 5/0 blue water hook. This is a real solid hook, and when you're tying this fly it's essential to have a strong and heavy hook, because the way this fly is going to swim is the hook is going to sink below the water. When you strip this fly, it's going to pull down at about a 45 degree angle, create a nice bubble trail, and then float right back up to the surface. Something that I don't think you can get from really any other fly pattern. Get in there and tie this down, and make sure your eyes are where they need to be on either side.
From here, moving into some ram's wool - sheep fleece, whatever you want to call it. I'm going to measure that so it comes right towards the end of that foam cylinder. This is a real nice material, provides instant volume, and it's going to tie this whole fly together nicely. Once this thing's done, you'll see how squid-like it looks. It's a very realistic imitation. Cut that right at the hide and bring your thread right on back. I'll get in once more and just clean up anything that's disastrous in there. Now we're going to get that sheep fleece tied 360 degrees around the shank. It's sort of easy to distribute, but take your time and make sure it is fully around the hook shank. I'm going to leave that there because it's going to add some volume, which is much needed for the profile of a squid.
Bring our thread an eye's length or so behind that, and we're going to grab another patch of sheep's fleece. This one doesn't need to be as long - it's going to taper in. Cut it close to the hide and clear out any of those disruptive fibers. We want it to be a little shorter than that previous bunch, just to create the taper and natural profile of a squid. Squid are a real solid critter to imitate. I find them very fun to tie, and they're just one of those things that gets eaten by pretty much all game fish. They call striped bass squid hounds for a reason, and things like bluefish, even blue marlin will eat a squid. They're a pretty ubiquitous form of bait.
Now we're going to move in with some bucktail. When you're selecting your bucktail for this fly, you're going to want some length to it because we want this to extend just into those feathers at least. Clip it close to the hide - we're using about a pencil's width in thickness. Clean out any of the shorts, those aren't going to help you out, and straighten those tips and snip that nice and flush. Measure it so those tips extend into the feathers if you can, but at least towards the end of that foam cylinder. A couple loose wraps and distribute this evenly around the hook shank, just like we did with that sheep fleece. It helps to have thread pressure when you need it, and take it off whenever you need to adjust those fibers. This looks sort of crazy, but take it out of the vise after you're done tying and soak it in some water and let it hang dry, and you'll definitely like the way it looks after that.
If you guys like what you see today, be sure to hit the Like button below, and if you really like what you see, hit the Subscribe button so you don't miss any of these videos we have coming out in the future.
Now that that's nice and clean, we're coming in with one final bunch of bucktail. I'm going to use the more hollow stuff down towards the base because I don't want to have to hollow tie this - I'm going to just straight bucktail deceiver tie it. I want to maintain some of that nice hollow characteristic that will make this flare easily. I want to measure it so that it has some taper to it, just about 15% to 20% shorter than that first bunch. A few loose wraps, and then work those fibers all the way around the shank. This is another genius pattern from Bob Popovics. Like all of his others, that guy is about as smart as it comes when we're dealing with fly design. This thing swims beautifully in the water, and as you can see, it looks pretty dang close to the real McCoy.
Now I'm going to clip these fibers off and do some final adjusting before we finish, and we'll make a nice little head here. If you need to decrease the angle of those fibers at all, now you can do that with your thread control. If you want, you can definitely get in there and dot this all up with some Copic markers or some Sharpies. You can put dots all the way down this to imitate the chromatophores that all squids have. I'm going to skip that because there's something I just like about a nice clean white squid. You can certainly get in there with some colors like brown, pink, orange, red - squids are never lacking in color. Let's go ahead and whip finish that off. That is a rear floating squid. I want to thank you guys for watching, and I will see you next time.

Comments
(1)Not a salt water fisherman but this was great!—as they all are. Thanks!