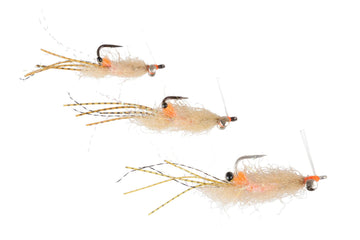
When it comes to targeting tarpon in the crystal-clear waters of the Florida Keys, presentation is everything. The Andy Mill Shrimp, demonstrated here by Ryan Brod at Trident Fly Fishing, is a refined variation of the classic shrimp pattern that has proven incredibly effective for oceanside tarpon fishing. Named after the legendary angler Andy Mill, this pattern is specifically designed for clear water conditions where tarpon can closely inspect your offering.
What sets this shrimp pattern apart is its sparse profile and strategic material placement. The plastic bead chain eyes are positioned farther back than traditional patterns, creating a more natural sink rate and swimming action. The combination of marabou, cross-cut rabbit strips, and ice dub creates a fly that pulses and breathes in the water, perfectly mimicking the movement of natural shrimp that tarpon feed on around grass beds and structure. Whether you're sight fishing to rolling tarpon or blind casting around likely holding areas, the Andy Mill Shrimp delivers the realistic presentation these impressive gamefish demand.
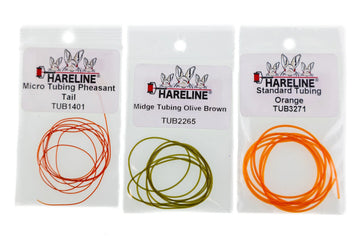
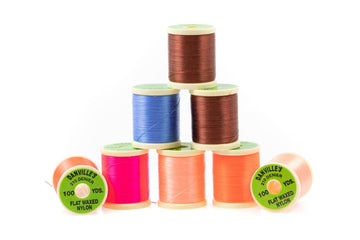
What's up everybody, it's Ryan with Trident Fly Fishing. Today we're going to be tying the Andy Mill Shrimp. This is a bit of a variation of that classic shrimp fly that's used for tarpon, especially Clearwater or Oceanside tarpon in the Keys. We're going to start by tying this on a Yamagatsu 2-0 SC-15 and I'm using 6-0 thread today in this sort of ginger color. I'm going to start right behind the hook eye. I want this fly to be relatively light and this fly design has the plastic bead chain eyes a little bit farther back than usual. So I'm going to go back about almost halfway between the back of the hook eye and the hook point and I'm going to use these olive size medium plastic bead chain eyes. So I'm going to tie those in here. A couple cross wraps. Nice thing about plastic eyes is they won't. They have a tendency to kind of stay in place whereas the classic bead chain you have to secure them a little more. They have a tendency to roll. I'm going to create that thread base there beneath the eyes. Great. Now I can move back to the hook bend. I do want to do touching wraps as I go. A lot of the folks who fish tarpon are aware of that. Try not to have any type of the hook shank showing for fear of these fish, you know, they have huge eyes. They're often inspecting the fly from below and if you have the glint off the shiny hook that can be a problem. So I'm going back a little bit beyond the hook point. Great. So I'm just mindful too in this case with this fly I just have this amount of room basically from here to the eyes to put in my marabou tail, the cross cut rabbit collar, and we're going to finish the fly off with a little bit of ice dub in tan. So as you're tying this fly just be mindful of the fact that you've lost that amount of shank as far as adding material. So you have to be pretty efficient with your thread wraps and adding material. So I'm going to use extra select marabou tan. This is from Hairline and I'm looking for really good material, good like quality feather. That one looks pretty solid here. I'm going to cut that off about halfway down. That's a relatively spare or sparse fly. I want that tail to come off so that it's not pointed down towards the hook. So I'm going to tie it in like that. And one thing you can do, and once this gets wet it has a lot of action, a lot of movement, one thing I can do to try to minimize fouling so that that tail doesn't wrap around the hook is just lift that up and I can do a couple wraps here right at the base of that tie-in point. You can see that I'll kick the material up a little bit. It's still possible that that might foul once in a while, but now you have that nice base. You can see it's kicking up a little bit at an angle. Next step is to add a little piece of flash. Some folks tie this with flash, some don't. I'm just going to use minimal flash, one piece of flash. The flash that you choose is totally up to you. One on my side. And then I have enough to tie on the other side as well. I'm just doubling up that strand, being careful not to hit the hook point. Great. I'm going to just trim the end there so it's not any longer than the tail. Perfect. Now I have that nice flash that's going to catch some light. Okay, again, I'm working with this much real estate. The next step is to add cross-cut rabbit strips. This is in light brown, and when I make that cut, I'm going to cut that at a bit of an angle. My scissors need a sharpening. So that the tie-in point is a bit of a triangle as opposed to a flush cross-cut cut with my scissors. I'm going to lay that around top of the hook shank, a couple loose wraps to capture it, and then tie it down. Make sure it's not going anywhere. I'm going to advance the thread a little bit beyond the hook point, right about here, leaving myself a little bit of room here for the crystal, sorry, for the ice dub. That's going to finish off the fly. Okay, so the next step is to palmer this cross-cut rabbit. You can use the rotary vise if you'd like. As I'm wrapping this, I'm pulling down pretty tightly when I'm underneath the fly. These are touching wraps. I want to build up as much volume as possible without taking up, again, without taking up too much space on the hook shank. Probably do one more wrap. Great. To tie this off, I'm going to hold this leather with my strong hand and use my off hand to bring that thread up and over at an angle like that. I'm going to do that a couple of times. I'm going across the hook shank like that. Now I'm going to sweep that back like so, and I'm actually going to tie a couple wraps up onto the leather, pulling this back. Good. Now, when I make this cut, I want to be careful that I don't accidentally cut some of the material I just tied on the hook. I'm pretty tight to the shank when I cut that off. You'll notice there's this kind of jagged edge here. That's okay. I can cover that with a few thread wraps. Now we have maintained, as you can see, I've maintained a little bit of room for me to use that ice tub to finish it off. I have this nice collar now. It veils the hook a little bit. It creates that kind of nice natural, you can see that lighter to darker part here. It's almost like a vertical line of color, which I like. Now we're going to add the last step of the fly, which is ice tub and tan. This is the UV ice tub from Hairline. As you know, all of these products are available at tryandflyfishing.com. The ice tub is relatively spare. It's really thin. It's kind of hard to use, so I'm going to kind of parse it apart like that and make a stack so that the fibers are relatively equal in length. Not exactly, but that's okay. I'm going to kind of hold it up on here so half of the material is going back into what's been tied in, and half is in front of my tie-in point. And a couple of loose wraps, like so. That kind of slipped a little bit. That's better. And I'm going to pull that back as I go. I'm going to brush this out once I get more tie-ins. And again, I'm kind of parsing this out from the package. I'm building these little clumps, like so. And then I'm holding them up so that they kind of wrap around the hook shank a little bit. A couple of loose wraps. It's going to slip a little bit. That's okay. Pull that material back. Great. I can probably get a couple more in here. It's so thin that it's hard to create volume with it, so you might have to do what I'm going to do now, which is get a couple clumps tied in on each side. I'm being mindful of staying behind those plastic eyes. Sweeping that material back, like so. Getting there. And it may look a little bit sparse, but as I add material, I kind of fluff it up a little bit. You'll see it. It'll get more volume. Just a couple of wraps. Really pull that material back. It's okay if they go around the eyes. That's not a big deal. Great. One thing I can do is eyeball underneath just to see that there's sort of a similar diameter around the fly. You might be able to see your thread wraps, and that's okay. I don't think that's that big of a deal. The thread is pretty similar in color to the eye stub. When I get to that point there, I'm going to move the thread, advance the thread in front of the eyes. I'm going to really make sure that I have a nice coverage over the hook shank. Sometimes people, because they use this around sargassum grass or just areas on the ocean where there tends to be a little bit of grass, that's where the shrimp are in the first place, they may tie this with a weed guard in front. You can use like 30 pound monofilament and tie it in here to sort of come down and protect the hook point from any grass. I'm going to whip finish. If you have a little brush, comb, that would work well to kind of pluck this material out. You can also use the tip of your scissors like I'm doing here. You can also, this is kind of a cheap trick, I've been using these eyes for a while, and you'll see these like plastic remnants from where the eyes were attached. I can use that to pluck out the volume here. You can see the volume kind of sticks up a little bit. Now what looked like a pretty sparse fly has a little bit more body, a little more volume, and I can pluck those stray pieces out, and I can use the rotary vice to kind of move around again to eyeball any stragglers that might be in there. And that is a variation of the annual male shrimp fly.


Comments
(0)No comments yet. Be the first!