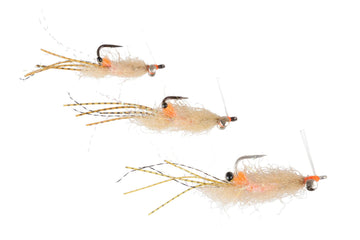
When tarpon get pressured and start refusing flashy, heavily dressed patterns, it's time to scale down. The Tarpon Tapas is exactly the kind of sparse, subtle shrimp imitation that can turn lockjaw fish into eat machines. Here at Trident Fly Fishing, we love this pattern because it strikes the perfect balance between simplicity and effectiveness. It's quick to tie, easy to cast, and absolutely deadly when fish are keyed in on shrimp.
Originally designed with finicky tarpon in mind, the Tarpon Tapas shines in the Florida Keys, along the Gulf Coast, and anywhere tarpon are hunting shrimp in shallow, clear water. But don't let the name fool you, this fly is equally at home for Snook, in the surf, or even dock lights at night. A simple color and size adjustment is all it takes to tailor it to your target species. Tie it on a size 2/0 for tarpon, or drop down to a size 1 or 2 for snook and stripers.
What makes this fly work is a combination of thoughtful materials and smart construction. The wispy craft fur tail pulses with life in any current, an orange Estaz egg sack triggers that instinctive feeding response, and an EP Minnow Head brush gives the fly a buggy, translucent profile that looks convincingly alive. Ryan also borrows a trick from Tim Borski's playbook, adding vertical barring with a gold Sharpie to give the finished fly that unmistakable shrimpy look. Follow along below, and you'll have a box full of Tarpon Tapas ready for your next flat.
Hey everybody, it's Ryan with Trident Fly Fishing. We're going to be tying the tarpon topus fly today, uh, which is a really simple shrimp fly that is designed for tarpon, but it's also great for straight bass. And we're going to tie this today on a size two Gamagatu SC15 hook. And I'm going to be using rust brown six thread. If you're going to tie this for stripers or snook, you'd probably tie it on a size one hook or even a two. Uh, but we're going to go up a little bit bigger in size today for tarpon. So, I'm going to tie in right in front of the hook point and make touching wraps back towards the bend. This fly uses a craft fur tail. And craft fur is notoriously tricky to work with. Um, it's pretty stringy fibers. uh very kind of thin, wispy. So, you oftentimes have to take two clumps to really get the the profile and the bulk on the tail that you want. So, I'm going to take one pretty goodiz clump here. And I'm going to be careful to t to cut pretty close to the um the base here. And when you do that, what I do is I grab the tips of the strands. And with my right hand, I pull off this kind of fluffy stuff here. You don't really you don't want that on your on your fly. It's not going to help anything. So, you can see it becomes pretty wispy. This stuff looks great in the water. So, it is worth it. It is worth the hassle. I want that to be about I would say two and a half uh shank lengths off the back. And I can kind of pull off the stragglers here that are too long. So, I'm going to kind of eyeball that. I'm going to make a nice square cut here. And I'm going to tie that right on top of the hook band, the hook shank. Couple loose wraps and then lock it in. Great. That's pretty sparse, right? If I was tying a snook fly, that might work. If I was tying this for a snook, I should say, I want a little bit more tail. So, I'm going to take another clump. Same idea. Cutting close down to the base. Using my right hand to pull away those fibers like that. and you're left with just the sort of wispy fibers that have tons of action. If you can find some current to sweep this fly through, that's a deadly pattern. I'm just cutting to length using the first tie-in point as a reference. Kind of get those fibers to sit right next to each other like so. Great. Now, you notice the natural tendency right now is for that tail to kind of droop down. If I were to fish it just like this, there'd be a high percentage that this tail would foul. In other words, this material would wrap around the hook, especially when I got wet or if I was casting in the wind. So, one thing I'm going to do now to add a little bit of a hot spot, a flash, um, but also to give this some Well, the first thing I'm going to do is make some wraps underneath the material. And to do that, I'm going to hold the material up with my left hand, my pointer finger and thumb. And I'm going to bring my thread over. So, it's making a a loop around the base of the tail material. Notice I'm not going beneath the hook shank. I'm staying right on top. So, it's just creating this nice wrap around the base of the tail. I'm going to do that four or five times. That's going to kick that tail up nicely like so. You can see it kind of kicks it up and off the hook a little bit. That's not exactly foolproof for for like protecting it from fouling, but you're in a better shape. Now, the next step is I'm going to add some orange estaz uh fibers here. And I'm going to tie this in in a way that again supports the tail a little bit. And this is chenille. the orange. The idea with the orange is to make this look like an egg sack, like it's a spawning shrimp. Um, so what I'm going to do is tie it in on my side of the hook shank. I'm going to wrap over and then I'm going to go behind. I'm do that twice. So over wrap around the hook and then behind the tail like that. And now I'm going to wrap forward. I advanced my thread just in front of the tying point right in here. So, I'm going to make nice touching wraps here to create this orange hot spot like an egg sack. Doesn't seem like much, but I've had better luck with the pattern tying this chenille in, especially in this orange color. That looks good. Couple wraps over the top. Sweep the material back over the top here with a couple wraps. Get that nice and locked in. If you see these little fibers poking out again, pull that. Sweep them back with your left hand. Tie right up and over them. And then I can make just one nice clean cut. Good to go. Cool. So now I have those thread wraps at the base of the tail kicking it up and I also have this um orange chenille going underneath it which is again going to add to that keeping the tail up away from the hook shank. Great last step. I'm going to be using some EP minnow head. This is in the shrimp tan color. This is pretty This has some good flash to it. This would be a great dock fly at night for snooker tarpon. It also be a really nice striper fly on the flats and a smaller size hook. Okay. So, I'm going to tie the brush in on my side of the hook. I'm going to tie in just on that wire like so. Make sure that's nice and locked down. I'm not going to advance my thread too far. Just enough so I can get three or four wraps with this material. So, I like to wrap down and away. And I'm pulling back. I'm sweeping back the material as I go. Nice and tight as you're wrapping this material. Keeping it pretty taut all the way around. That's two. Let's do one more wrap. Three. One more. Four. So, I'm going to tie off on that fourth wrap. I'm going to go up and try to go through that material so I don't catch too much of it. It's okay if you do. You can just trim it. Sweep it back. That seems pretty locked in. I'm going to add some tension here just so I can cut really close to the hook shank. Don't use your good good scissors like I just did. Great. So, now I have this head. Um, it should be what the the nice thing about the brush is if you sweep it back as you're palmering it, you'll have a pretty nice even amount of material all the way around the hook shank. Just capturing some of those strays that pushed out in front of my thread wraps. And I want to build a nice little head here and round it off. Looks good to me. So, I'm going to whip finish here. Great. Now, you could use a little brush here. You could use the point of your scissors like I'm going to do. Just kind of pull that material out a little bit. When you do that, you'll see some of the strays kind of fall out. The nice thing with the rotary vise is I can kind of spin it. If I notice fibers that are sticking way out, I can just trim them, get them right out of your way. Can also pluck these ones out if you prefer. The only other cut that I'm going to make now is I want to make sure that orange is visible from beneath. So I'm going to make one cut here. Just like that. So that that's going to allow that orange to kind of peek through. Cool. This fly also in a way resembles Tim Borski's bonefish slider fly that had the tan um craft fur tail. And one thing he did which is kind of ingenious is he just use a Sharpie. So I'm going to use this gold colored Sharpie to add barring vertical barring. One stripe on my side, one stripe on the far side. You can see it'll kind of bleed into the material. Great. And that gives that the sort of vertical barring. Um, it looks very shrimpy. Some guys will fish this with mono eyes sticking back out below the craft fur. That works really well, too. Last step is I'm going to take some of this hard as hell penetrator head cement, and I'm just going to brush it into the thread wraps in the front. It's going to lock everything in place. There you have it. It's a simple fly. Has great action. It's easy to cast. And it is a great fly anywhere fish are eating shrimp.

























Comments
(0)No comments yet. Be the first!