
Learn how to tie the October Caddis Dry Fly, including a video tutorial and a full material list. Improve your fly-tying skills here.
Did you find this video helpful? We've got hundreds more just like it. Subscribe to Trident's YouTube Channel and enhance your fly-tying skills. New videos are posted frequently in a variety of different patterns.
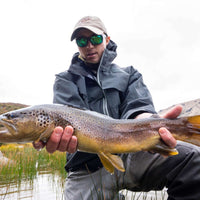
The October Caddis Fly is a high-floating dry fly designed by Barry Clark. This pattern features natural materials such as deer hair and hackle to create a fly that rides high on the surface and is easy to see in various light conditions. Its buoyancy allows for fishing small droppers below when fish are simultaneously eating dries and nymphs. With its orange body, the October Caddis Fly beautifully imitates this larger fall species of Caddis. If you love fishing big dry flies in the fall, consider tying some October Caddis to add to your fly box.
We've put together a kit that contains all the materials you need to tie this exact fly pattern.
Click the button below to shop the selection.
Material list:
- Hook: Mustad R43NP-BR Dry Fly Hooks (size: 12)
- Thread: Veevus GSP Thread 100 Denier (color: black)
- Body: Hareline Hare-Tron Dubbing (color: burnt orange)
- Wing: Hareline Premo Deer Hair Strips (color: olive)
- Hackle: Whiting Dry Fly Hackle Full Cape (color: natural dun)
- Adhesive: Loon Water Based Head Cement
Video Transcript
Hello, I'm Carl at Trident Fly Fishing and today we're going to tie the October Caddis. This is a fly done by Barry Clark and it's a high floating fly that works well in streams and still water. Suggested tying sizes are 8 through 16. Here's the fly in the vise - we'll get the tie started.
The hook we're going to use today is a Mustad R43. This is a size 10 and this is their one extra fine, three extra long dry fly hook. Our thread today is Veevus GSP, 100 denier. I favor this for any deer hair work - it's really strong. We'll start our thread about two eye lengths behind the hook eye and wrap down towards the bend of the hook.
Here we're going to tie in our first material. It's going to be from a Whiting dry fly cape, in silver badger. I've already removed the feather and sized it to the hook. We'll prep that up by removing some of the barbules next to the stem. The black center of this is going to show up well against the body of the fly, and that's the reason it was chosen. Right back to the feather.
For the body of the fly we're going to use some Hareline Hare-Tron dubbing in burnt orange. It's a mixture of rabbit and some synthetics - it's got some spikiness to it and a little bit of flash. We'll take a wrap or two behind that feather, at least one, and then start forward. I need a little more than I've got on there, just a touch more. There we go. Now we'll palmer that feather forward. You can see that the black center gives us some nice segmentation to the body. We'll capture that and tie it off. Cut our excess.
Now for the wing of the fly. I'm going to use a Premo deer hair strip in olive. As you can see this one's well used. Cut off a fairly healthy chunk - it's a good sized fly. Strip out all the fuzzies with our Stonfo tool. Get this into the stacker. This time of the year here in Maine, static electricity is part of the game. That hair's a lot longer than I need it, so I'm going to trim some of that just to make it easier to work with. I'm going to measure this out to be the length of the hook.
Hold on tight. We're going to wrap the thread through all of that hair until we get up to the eye. Once we get there we'll expose the eye. Get out our whip finish tool, make a four or five turn whip finish, seat the knot, and cut the thread.
Now we're going to separate out that material from the wing to make it easier to see what we're doing and form the head. This is a Stonfo razor holder - you can adjust the curvature of the blade, which is a nice feature. Start on the bottom, now the top. Cut back into it. Be careful not to cut any of the hair from the wing. Just lean it up against the downturn of the eye to get the angle that I want and gently push up. We'll clean up the few stragglers with a pair of scissors.
Now to tighten and neaten that head up, we're going to use a lighter to burn some of that away. You want to protect the fly with your hand like so. Always burn from the top down. Just use your finger to move the soot off and get a nice tight head.
This is Loon's water based head cement. A little head cement, clean the eye out, and our fly is finished.
Comments
(0)No comments yet. Be the first!