
Learn how to tie the Morrish Mouse fly pattern including step-by-step instructions, a video tutorial, pictures, and much more. Improve your fly tying skills here.
Materials:
We've put together a kit that contains all the materials you need to tie this exact fly pattern.
Click the button below to shop the selection.
- Gamakatsu B10S Stinger Hook - Size 1
- Veevus GSP Thread - 100D, Black
- Hareline Zonker Cut Rabbit Hide
- Hareline Fly Foam - 6mm, Black
- Hareline Premo Deer Hair Strips - Natural
Trident Fly Fishing is a full-service fly shop. We spend a lot of time testing gear and writing reviews to give you all of the tools to make your next trip a success. We are not a blog or a review site. 100% of our funding comes from your gear purchases, so if this blog post helps you on your next fly fishing adventure, please support us by buying your gear from us.
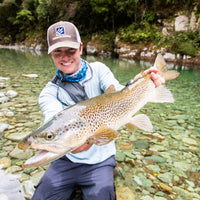
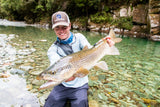
Mouse fishing is popular across the western US and around the world (New Zealand comes to mind). Large brown trout do a lot of feeding at night and can be fooled on mouse patterns depending on the time of year and the conditions. In places like Alaska, fish feed on mice even in the high sun. There's nothing quite like seeing a large predatory fish explode on a mouse as it's waking through the water. Tune in as Jared takes us through the steps necessary to tie the Morrish Mouse, one of the most popular mouse patterns in all of fly fishing.
Step One:

Start your thread and tie in the tail of the fly. Trim the Zonker Cut Rabbit Hide to eliminate the hair on the front and middle of the hide. Leave a tuft of hair at the end. Measure it so it extends roughly 3x the length of the hook shank and tie it in at the bend of the hook.
Step Two:

Next, trim the Fly Foam (or use a body cutter) to create the body of the fly and tie it in right in front of the tail. Trim a thin tag on one side of the tail to create a tie in point. This will help limit the bulk of the fly.
Step Three:

Next, select a chunk of Deer Hair just thicker than a pencil, stack it, and spin it around the hook shank just in front of the foam. Catch the Deer Hair with two loose wraps then tighten those wraps down and use your fingers to help spin the hair around the hook shank. Use scissors to trim just the top section of the butts.
Step Four:

Repeat Step 3 with another chunk of Deer Hair just in front of the last clump of spun hair.
Step Five:

Continue repeating Step 3 until you have a full body of spun Deer Hair around the hook shank. Again, trim the butts on top of the hook shank after spinning each section of Deer Hair.
Step Six:

Use a bodkin to spread the hair apart to make room for the Fly Foam that will come over the top of the fly. After spreading the hair, pull the foam over top of the fly and tie it in just behind the hook eye.
Step Seven:

Trim the excess foam to create the head of the fly. Also, be sure to use fine-tip scissors to trim any hair that may have gotten into the eye of the hook.
Step Eight:

Next, flip the fly over and trim all of the spun hair on the underside of the fly. This will create the body of the mouse and get rid of a lot of the bulk of the fly. You can trim the underside of the mouse however you see fit.
Step Nine:

Finally, throw a whip finish and trim the head of the fly for a more lifelike, rounded profile.
Step Ten:

And that's the Morrish Mouse! You can continue trimming the body of the mouse to make it look more lifelike or leave it as-is. Fish this at night or during the day (in certain parts of the world) for some explosive trout action.
Questions?
Give us a call here at the shop at (888) 413-5211 or email us anytime at [email protected].
Comments
(0)No comments yet. Be the first!