
Learn how to tie the Bopper Hopper fly pattern including step-by-step instructions, a video tutorial, pictures, and much more. Improve your fly tying skills here.
Trident Fly Fishing is a full-service fly shop. We spend a lot of time testing gear and writing reviews to give you all of the tools to make your next trip a success. We are not a blog or a review site. 100% of our funding comes from your gear purchases, so if this blog post helps you on your next fly fishing adventure, please support us by buying your gear from us.
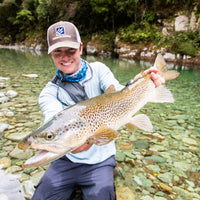
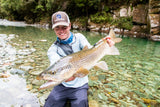
This is an effective hopper pattern designed to entice large trout from the US West to Patagonia and everywhere in between. Hoppers are a staple of a trout's diet here in the US and beyond and there's nothing better than getting a large trout to eat a high-floating hopper on the surface. This pattern is built for extra floatation, a lifelike profile, and super fish-catching power. Tune in as Jared takes us through every step needed to tie the Bopper Hopper.
Materials:
We've put together a kit that contains all the materials you need to tie this exact fly pattern.
Click the button below to shop the selection.
- Tiemco 200R Nymph and Dry Fly Hook - Size 12
- UTC Ultra Thread 140 Denier - Yellow
- Whiting 100 Pack - Size 16, Grizzly Golden Straw
- Hareline Fly Foam - Tan
- D's Flyes Web Wing Mottled - Brown
- Hareline Para Post Wing - White
- Spirit River UV2 Elk Hair
- Hareline Grizzly Barred Rubber Legs - Tan
Step One:

Start your thread, wrap it rearward to the bend of the hook, and tie in the Whiting Hackle. After tying in the hackle, advance your thread to just behind the eye of the hook then wrap the hackle forward taking tight turns. Tie the hackle off just behind the eye of the hook then snip off the excess.
Step Two:

Wrap your thread rearward through the hackle and tie in the foam body. First, tie in the back of the foam at the bend of the hook to secure it in place. Fold back the foam and wrap your thread forward. Tie in the front of the foam just behind the eye of the hook.
Step Three:

Next, tie in the Web Wing. The Web Wing should be slightly wider than the foam body of the fly. Tie it in at the same tie-in point that you used to anchor the foam down. Snip the Web Wing as close to the thread as you can.
Step Four:

Next tie in the Para Post Wing at the same tie in point. Measure the Para Post so it extends slightly past the body and tie it in on top of the hook shank. We'll trim the excess later.
Step Five:

Tie in the Elk Hair. Snip a chunk of Elk Hair just wider than a pencil and comb out the under hair. Lightly stack the hair then tie it in on top of the hook shank at the same place you tied in the wing and Para Post. Measure the Elk Hair so it is roughly the same length as the Para Post Wing. Catch the hair with two loose wraps then pull down to flare the hair.
Step Six:

Pull the Para Post Wing and the Elk Hair forward and cut them so they're even with the foam head.
Step Seven:

Trim the sides and top of the head to size. Get rid of a lot of the flared Elk Hair to give the head of the fly a more lifelike profile.
Step Eight:

Next, tie in the rubber legs on both sides of the fly. First, tie the wings in on the side of the fly closest to you then wrap them around the front and tie them in on the other side of the fly.
Step Nine:

After the legs are tied down, snip the front loop and trim them to the desired length.
Step Ten:

Whip finish and you're done! That's the Bopper Hopper, a great hopper or Stonefly imitation. This fly works well in the western US and around the world for hungry trout looking for a large meal.
Questions?
Give us a call here at the shop at (888) 413-5211 or email us anytime at [email protected].
Comments
(0)No comments yet. Be the first!