
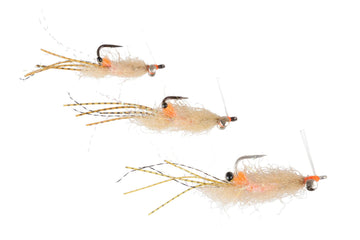


Learn how to tie the Peeping Caddis Nymph fly pattern, including step-by-step instructions, a video tutorial, pictures, and much more. Improve your fly-tying skills here.
Trident Fly Fishing is a full-service fly shop. We spend a lot of time testing gear and writing reviews to give you all of the tools to make your next trip a success. We are not a blog or a review site. 100% of our funding comes from your gear purchases, so if this blog post helps you on your next fly fishing adventure, please support us by buying your gear from us
This nymph pattern is meant to imitate a cased caddis. The colors used should be matched to the cased caddis you see in your home waters but brown, olive, or green are common. Their segmented abdomen is usually protected by a portable house they build from debris found along the stream bed allowing just their head and 3 pairs of legs exposed. These are a major fish food source and are always on the menu.
Material List
- Hook: Daiichi 4640 size 12
- Thread: UTC 70 Denier in Black
- Bead: Hareline Slotted Tungsten Bead in Black
- Legs: Partridge Feather
- Rib: UTC Copper Wire size Small
- Collar: Hareline UV Ice Dubbing in Cinnamin
- Body: Natures Spirit Snowshoe Rabbit Foot Dubbing in Brown
Video Transcript
Hello, I'm Karl at Trident Fly Fishing. Today we're going to tie the Peeping Caddis. This pattern is meant to imitate a cased caddis, and the colors you use should be matched to the cased caddis in your home waters, but that's usually brown, olive, or green. Their segmented bodies are usually protected by a portable house that they carry around, and they build this from debris found along the bottom of the streambed. It allows just their head and three pairs of legs to be exposed. These are a major food source, and they're always on the menu.
Here is the completed fly in the vise. The hook we're going to use today is a Daiichi 4640 - it's a jig hook. This is a size 14, and we have an eighth-inch slotted tungsten bead. Our thread will be UTC 70 Denier in black.
We'll get our thread started right behind that bead and form a small ball there to help hold that bead up against the hook eye, then wrap back to the bend of the hook where the bend starts, just above the hook point.
The first material we're going to tie in is just going to be some yarn. This is in a tan color. It's a three-strand, and it's a little bit more than I need, so I'm going to finagle one strand out of the group and be left with two. What we're going to do here is burn the very end of this wool to form the black head that you would see on a caddis, like so. Once it's burned, keep your fingers off it until that has a chance to set. We're going to tie this in on top of the hook, and we want it to be about a hook's gap in length. We'll wrap forward to the bead, cut off our excess material, and neaten this up a little bit.
The next material we're going to tie in is going to be the legs that extend from the case. For that, we're just going to use a feather from a well-used partridge cape. We'll prepare it by stripping away all the fuzzy, unusable feathers, then bring the feathers back to form a small triangular tip. Snip that off so we have about a millimeter and a half to tie in. Take our hackle pliers - we'll get about two turns out of this. We don't want too many. Already with two turns it's going to emphasize more legs than it has. Cut off our excess feather and wrap back up towards the head to cause the feather to lay down around the head. We'll get rid of any stray fibers.
Now we're going to add just a little bit of sparkle to this. This is Hareline's Ice Dub, and the color we're going to use is UV Cinnamon. Just need a really small pinch of this - just a hint of color. Make a small collar right there.
The body of this fly is going to be from Nature's Spirit. It's a snowshoe rabbit foot dubbing, and the color we're going to use is brown. We'll form a noodle on our thread and wrap this forward to the slotted bead. Now we'll bring our rib forward and take four or five turns. Make your turns nice and even, and when we reach the bead we'll capture it with our thread and helicopter that off.
I'm going to add just a little bit of Zap-A-Gap to that thread to help keep everything from coming apart. Get our whip finish tool, do a four or five turn whip finish, seat our knot, cut our thread, and our fly is finished.
Please feel free to leave comments, and don't forget to hit that subscribe button to keep up to date on all the new content here at Trident Fly Fishing. Thanks for watching. Hope to see you again next time.

Comments
(0)No comments yet. Be the first!